Legitimize Your Project With Some Badge Swag
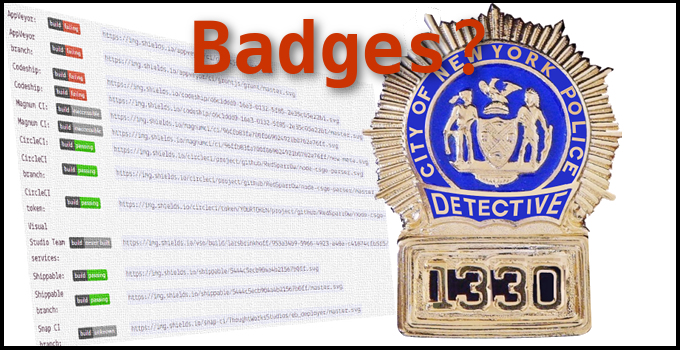
Badges? Why don’t I have any stinking badges?
With a flick or your wrist and a flourish of your cape, you unveil your latest open source beauty. It has more bells than a bell foundry, more whistles than a traffic cop convention. But there’s one problem: your OSS-contributing peers all have these cool badges decorating their projects. They’re so shiny and colorful! They imbue an air of legitimacy to their projects, like a detective flashing his badge at a crime scene. They’ve got badges showing off the pristine green state of their CI build, their sky high test coverage, the version of their NuGet package or Ruby gem. It’s just brilliant. You shake your head with badge envy.
So how do you add badges to your GitHub project? It’s actually not difficult at all. However, there’s no obvious “getting started” guide anywhere, so this post will save you a few minutes of your lifespan, leaving you time for the more important things, like fiddling with the badges on your OSS projects. :)
(Flashes badge) Detective Prolific from the 5th. I’m here to inspect your pull request.
“Shields up!”
If you want badges on GitHub, Shields.io is an incredible resource. They’ve got shields out the wazoo. You’ll notice that most GitHub projects are using them as one-stop-shopping for all of their pretty defensive shielding. Funny thing is, you won’t find much documentation or how-to guides on their website. At least, not at first. You raise a single inquisitive eyebrow. As you peruse their single page of awesomeness, you suddenly realize that their homepage is one giant ream of living documentation. They’re showcasing live examples of any type of badge you could ever want on a project.
You want build status? Boom! — Statusized! You want code coverage? They’ve got you covered! You want to show off how many downloads you get? Whoosh! There it is!
Shields.io is like a poster child for Specification by Example. They show you a visual example of the desired result along with the URI that gets you there.
| Badge | URL |
|---|---|
https://img.shields.io/travis/USER/REPO.svg | |
https://img.shields.io/coveralls/jekyll/jekyll/master.svg | |
https://img.shields.io/npm/dt/express.svg |
Let’s take a sample URI and break it down. Let’s say your project produces a NuGet package as part of the build process. Let’s say it’s located at https://www.nuget.org/packages/TW.Resfit.Core/. Shields.io “knows” about nuget.org and is able to parse version information from a given nuget URI. In order to generate a badge for the above NuGet package, send a HTTP GET request to https://img.shields.io/nuget/v/TW.Resfit.Core.svg. Shield.io’s RESTful API will return a lovely SVG badge displaying the version number of that NuGet package. How does it do it? Take a moment to grok the URI and it will be apparent.

| Part | Description |
|---|---|
| nuget | I want a NuGet badge |
| v | I want a version number badge |
| TW.Resfit.Core | I want the version of that particular NuGet package |
| .svg | I want the image in the SVG format |
Easy as 3.14159, am I right?
Shields.io: Custom Badges
What if you want a custom badge for something that Shields.io doesn’t currently support? They also have a feature for generating a custom badge. Like, totally custom. Scroll to the bottom of the Shields.io homepage and find the “Your Badge” heading. Just fill out the form with a custom subject, status, and color. Voilà — You’ve got a custom badge! For example, I created a green banana badge that’s pretty sweet, erm… sour: https://img.shields.io/badge/banana-green-brightgreen.svg
Shields.io: More fanciness
If you want more control over the design of your badges, check out the “Styles” heading, which is also at the bottom of the Shields.io homepage. There they demonstrate how you can stylize your badges to look more “plastic”, “flat”, “squared”, etc. You can even insert a custom logo image, further customize the badge colors, and more. Good stuff. Fancy!
You’ll also notice a donate button down there. This is a super useful service, so…
Other options
Shields.io handles most of your badge requirements, but it’s not the only game in town. Many popular services like AppVeyor and Coveralls.io also generate nice badge artifacts for their platforms. BuildStats.info is a great resource for showing an SVG graph of your build history which helps people visualize your project’s build times as well as how often your build is broken.
Read on for an example that brings all of these badge generation services together.
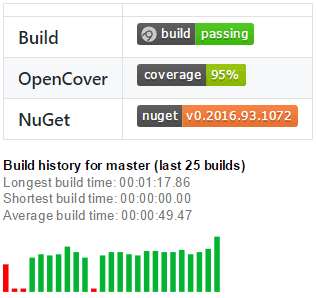
All together now: Add those badges to your GitHub README
Okay, so let’s put it all together. The screenshot at the beginning of this article is generating badges using AppVeyor, Coveralls.io, Shields.io, and BuildStats.info. Let’s see it again for convenience:

Here is the markdown for generating those badges.
| --- | --- |
| **Build** | [](https://ci.appveyor.com/project/tygerbytes/resourcefitness) |
| **OpenCover** | [](https://coveralls.io/github/tygerbytes/ResourceFitness?branch=master) |
| **NuGet** | [](https://www.nuget.org/packages/TW.Resfit.Core/)
[](https://ci.appveyor.com/project/tygerbytes/resourcefitness/history)Items of interest in that code are the markdown table, created using the pipes and dashes (| -- | -- |) and the markdown links. The markdown table syntax is self-explanatory, but the markdown link syntax there is a little confusing because each link in the table is a combination of a markdown link and a markdown image.
Here is the syntax for a markdown image:
And here is the syntax for a markdown link:
[My link text](https://my-amazing-link.com/what-what)When you put a markdown link and a markdown image together, you get:
[](https://my-amazing-link.com/it-is-so-wonderful.php)Pro tip: Don’t add a space between the square brackets and the parentheses of your markdown links or images. Otherwise GitHub won’t parse them correctly.
BAD:
[] ()GOOD:
[]()Well, there you have it folks — fancy informative badges for your project in a nutshell. I said it’d be easy, right? Hopefully that helps you bootstrap your project with some badge swag!
Ty Walls
Digital Construction Worker
Ty Walls is a software engineer in love with creating, learning, and teaching.