Build an SMS Bat-Signal Powered by Twilio and Azure Functions
 Photo by 1950sUnlimited (cc by 2.0)
Wouldn’t it be cool to send out an SMS SOS with the touch of a button? Like your own private SMS Bat-Signal!
I’ll show you how to do it using Twilio and an Azure Function. Here’s an overview of the simple architecture:
                                   /--> |        |--> 📱
|--(HTTP POST)--> [ Azure Func 𝛌 ] ---> | Twilio |--> 📱
                                   \--> |        |--> 📱
Simple, right? Let’s paint the clouds red, 160 characters at a time.
🤜 💥 🤛
Set up Twilio
The first thing you’ll need is a Twilio account . Twilio’s communication APIs make it easy to automate pretty much anything telephony worth doing: phone calls, faxes, and of course, sending and receiving SMS or even MMS messages. Sending SMS will cost you $0.0075 per message segment. That means sending 1,000 messages would cost you $7.50. Keep your messages under 160 characters though, and avoid emoji and even diacritics — otherwise your message will be split into multiple segments and that $7.50 could easily bloom into $22.50 or higher.
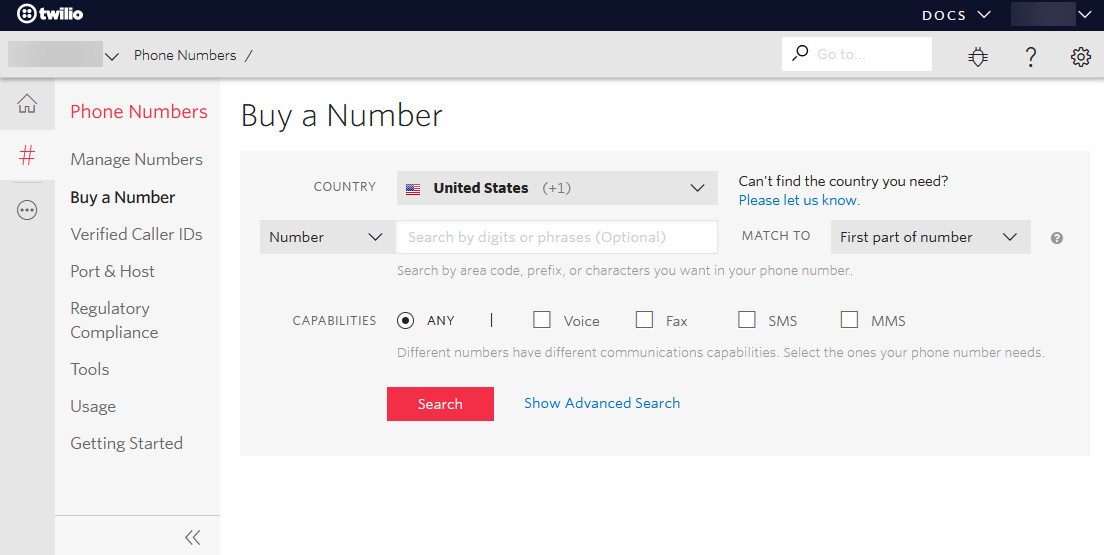
Once you set up a Twilio account, you’ll need to upgrade to a paid account * for a minimum buy-in of $20, as well as buy a phone number , which currently costs $1 per month. Don’t worry, this is the most expensive part. The Azure Function will only cost you pennies per month.
(* Use the referral link and we’ll both get $10 to spend at Twilio.)
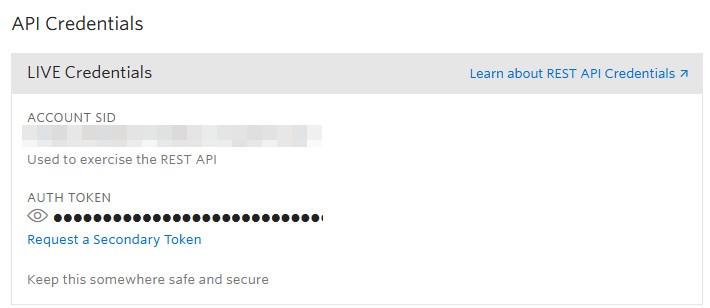
After you’ve got your Twilio account and phone number, you’ll need your account SID and Auth tokens to be able to interact with the Twilio API from our Azure Function. Scoot on over to https://www.twilio.com/console/project/settings to get those. The screen looks like this:
That’s all we need to do in Twilio for now, but if you want to kick the tires a bit more, head over to https://www.twilio.com/console/sms/getting-started/build and send yourself a test message. It’s fun. :)
Create the Azure Function
At this point you could just use curl or Postman
to send your SMS Bat-Signal, but let’s do it in an Azure Function — that allows you to more easily integrate your Bat-Signal into other workflows, perhaps sending an alert when an IoT alarm is tripped by the neighbor’s sly joker of a cat.
First create an Azure account if you haven’t already. That’ll take a few minutes. Make sure to choose a strong password and enable multifactor authentication.
Once you’re logged into the Azure portal, use the search bar at the top to search for Function App, then choose the Function App service. It should be the first option in the search results.
When you’ve arrived at the Function App page, click the Add button to add a new Function App. Your settings will look similar to those in the screenshot below.
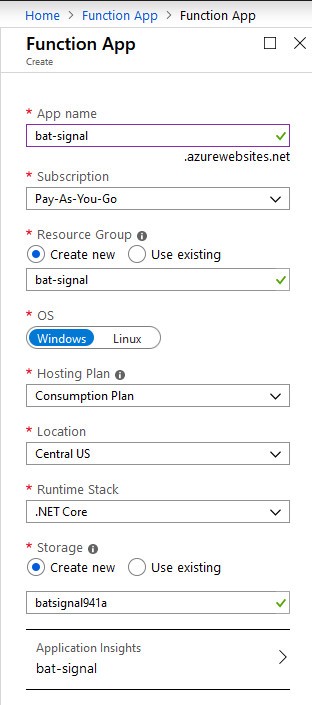
Create that resource and wait a minute or so for it to finish deploying. Now you just have to get the code in there somehow. For that, you’ve got a number of options.
- Deploy someone else’s code.
- Deploy directly from Visual Studio
- Write the code right there in the Azure portal.
- Create your own Git repo and deploy from there.
I’m all for making things as easy as possible, so I’ll show you how to deploy code I’ve already written. It’s open source on GitHub, so you can fork it and modify it to your heart’s content.
Deploy the Azure Function App from a GitHub repo
For those who want as close to a turnkey solution as possible, I’ve got a GitHub repo you can clone and deploy to your new Azure Function within a few minutes.
- Fork the tyger-sygnal repository on GitHub.
- In Azure, open your new
bat-signalAzure function and click the Platform features tab, then Deployment center![]()
Linking GitHub to Azure - For the Source Control step, link your GitHub account to Azure by clicking the GitHub option. GitHub will ask you to confirm that you’re allowing Azure to access it via its API. When that’s all linked up, select GitHub and continue.
- For the Build Provider step, select the App Service build service.
- For the Configure step, choose your GitHub account, the
tyger-sygnalfork, and themasterbranch. - Hit Continue and then Finish. Azure will deploy the code from the Git repository to your Azure function.

Once that’s deployed, you just have to configure a few environment variables in your Azure Function and you’re set. If you’re already in your function app’s Deployment Center tab, click the Platform Features tab, then click Configuration under General Settings. Under Application Settings, add the following environment variables:
| Environment Variable | Explanation |
|---|---|
| TWILIO_ACCOUNT_SID | Twilio SID you got ealier |
| TWILIO_AUTH_TOKEN | Twilio authentication token you got earlier |
| TWILIO_PHONE_NUMBER | Your Twilio phone number, including the country code. e.g. +12225559999 |
| SMS_SIGNATURE | Text that will be appended to every SMS you send through the function. |
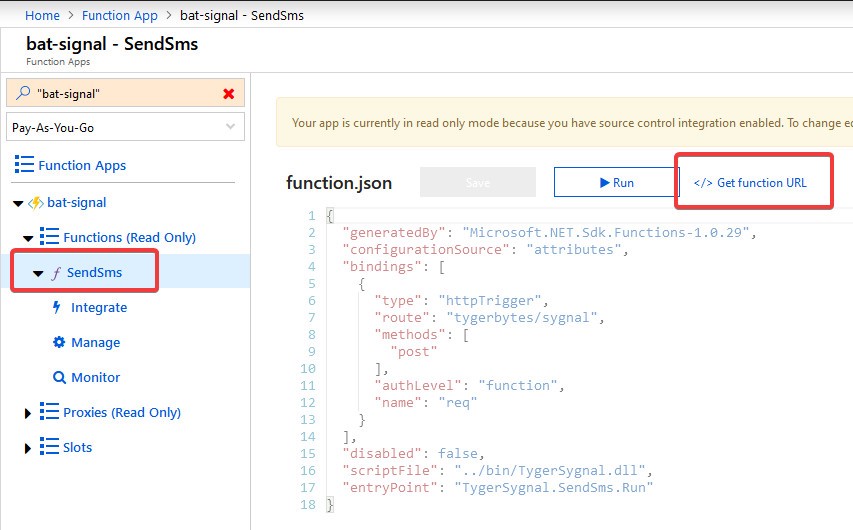
After you save those environment variables, you are ready to test this out! All you need is your function’s URL.
To get your function’s URL, select the SendSms function as shown in the screenshot, then click </> Get function URL. Click the Copy button and save that URL somewhere safe. Anyone with that link can invoke your function!
Test your Azure Function with Postman
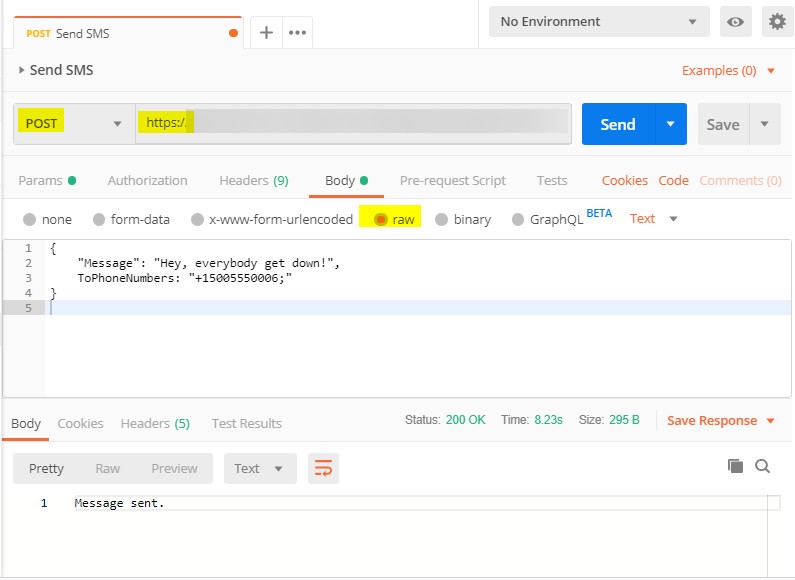
Install Postman if you don’t have it already. Then create a new POST request, paste in the URL of your Azure Function, and set the “raw” body to the following JSON:
{
  "Message": "Hey, everybody get down!",
  "ToPhoneNumbers": "+15005550006;"
}
ToPhoneNumbers is a semi-colon separated list of the phone numbers you want to send SMS messages to. Replace 15005550006 with your phone number. Your Postman screen should look like the one below. When you’re ready, hit send. A moment later, be prepared to hit the floor when that text message comes in!
Azure Function Code Explained
If you’d like to understand the code you’re executing up in that lofty cloud, here’s the code for the main function — with bat-loads of comments.
[FunctionName("SendSms")]
public static async Task<IActionResult> Run(
  // This is an HTTP trigger accepting POST requests. That's why we are able to invoke it using Postman.
  [HttpTrigger(AuthorizationLevel.Function, "post", Route = "tygerbytes/sygnal")] HttpRequest req,
  ILogger log,
  ExecutionContext context)
{
  // The FuncConfig class encapsulates environment-specific settings like those
  //  TWILIO... environment variables.
  var funcConfig = new FuncConfig(context);

  // Grab the request body, the thing we added as "raw" JSON content in Postman.
  string requestBody = await new StreamReader(req.Body).ReadToEndAsync();

  // "Deserialize" the JSON string into an SendSmsRequest object.
  var request = JsonConvert.DeserializeObject<SendSmsRequest>(requestBody);
  if (!request.IsValid())
  {
    // If this request is malformed, return a 400 Bad Request HTTP code.
    //  See the SendSmsRequest class for more info.
    return new BadRequestObjectResult(request.InvalidRequestReason());
  }

  // Convert the request object back to JSON (serialize) and log it.
  //  Wasteful? Perhaps. But very useful when debugging. :)
  log.LogInformation(Utils.ToJson(request));

  // Initialize the Twilio engine. Vroooom!
  await funcConfig.TwilioInitAsync();
  try
  {
    // Convert the semi-colon delimited list of phone numbers to an array
    //  of PhoneNumber objects, then send an SMS to each one.
    foreach (var number in Utils.SplitTo<PhoneNumber>(request.ToPhoneNumbers))
    {
      // Creating the MessageResource sends the SMS.
      var messageResource = MessageResource.Create(
        // Note that we append the SMS signature to the end of the message.
        body: $"{request.Message}\n{funcConfig.SmsSignature}",
        from: funcConfig.TwilioPhoneNumber,
        to: number
      );
      // Log it along with the status message returned.
      log.LogInformation($"SMS to {number} has been {messageResource.Status}.");
    }
  }
  catch (Exception ex)
  {
    // Uh-oh. Something went wrong. Send a HTTP 500 Internal Server error code,
    //  including the exception message.
    return new ObjectResult(ex.Message)
    {
      StatusCode = 500
    };
    throw;
  }

  // Yay! Everything worked. Return an HTTP 200 OK.
  return new OkObjectResult($"Message sent.");
}
Responding to replies
What happens if someone responds to these text messages? By default they’ll get this response from Twilio:
Thanks for the message. Configure your number’s SMS URL to change this message.Reply HELP for help.Reply STOP to unsubscribe.Msg&Data rates may apply.
It’s possible to create another Azure Function to handle replies and forward them to you cell number, but it’s probably not a great idea, unless you’ve got deep pockets, or you’re super nostalgic for the days of cell plans without unlimited texting. If you start holding word-rich back-and-forth emoji-laden SMS conversations over your Twilio phone number, that $0.0075 per segment blows up quicker than you’d think.
That said, depending on the response to this post, I may add an Azure Function to handle the replies.
Remember, this is our SMS Bat-Signal — it’s broadcast-only. I recommend just customizing Twilio’s canned response to indicate that you’re not listening to replies. To accomplish that, you have to configure your number’s SMS URL, exactly what the little voice in Twilio’s default SMS response told us to do.
Configure your number’s SMS URL
First off, you need to create your canned response as an XML file and upload it somewhere publicly accessible — even something like a public paste in Pastebin should work, as long as you use the “raw” link. The contents of the file should look like this:
<Response><Sms>Sorry, Mr. Wayne did not receive your message.</Sms></Response>Don’t get too fancy with this XML page though. If you add emoji or even diacritics, you could cause your message to be split into multiple segments because Twilio is forced to use the UCS2 format to send your message instead of the simpler — and smaller — GSM format. A tool you can use to see how your message will be segmented is smssplit .
Once you’ve got the URL to that file, head over to Twilio, URL in hand and a smile on your face.
In Twilio, manage your phone numbers: https://www.twilio.com/console/phone-numbers/
Select your phone number, then scroll to the bottom of the “Configure” tab. You’ll see a “Messaging” section, like this one.
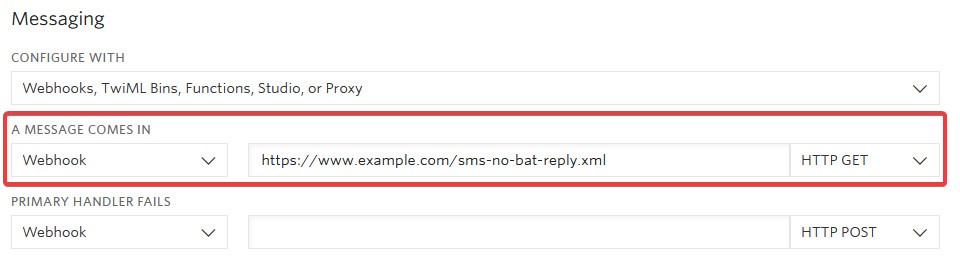
We’re interested in the A message comes in part. Replace the default URL with the URL to your canned XML response and hit save.
Use Postman to send a text message to yourself, then reply to it from your cellphone — you should receive the canned response. 😎🦇 Other than the information disclosure issue revealing your secret identity, your Bat-Signal is ready to go!
🤜 💥 🤛
Ty Walls
Digital Construction Worker
Ty Walls is a software engineer in love with creating, learning, and teaching.