Write a Custom Webhook to Handle MailGun events
 Photo by Grant Durr on Unsplash
Wouldn’t you like to know when MailGun fails to deliver an email? Or worse still, when someone complains about an email you sent?
MailGun can notify you about the following events:
- Clicked
- Complained
- Delivered
- Failed
- Opened
- Unsubscribed
There’s just one catch: You have to write your own webhook, then subscribe to those events with your webhook’s URL. If that thought left you cross-eyed, fear not! The reign of cloud computing has made this simpler than it used to be, especially the introduction of functions as a service.
I’ll show you how to create your own webhook to respond to MailGun events. We’ll use Microsoft’s Azure Functions, since they tend to be the most developer-friendly. And naturally, I’ll provide the code — even a GitHub repo , so you’ll be able to copy and fork, tweaking as you please.
Table of Contents
Step A: Get the lay of the land - MailGun land
First let’s get our bearings. What are webhooks, and how does MailGun employ them to let you know what’s going on with your email?
Webhooks - Just another listening service
Let’s say you’re interested in the outcome of some event — a horse race for example. There’s just one catch: You’ve got a life! You can’t spend all day down at the track. Not so easily defeated, you give your cell number to a reliable buddy down at the racetrack. As soon as the race results come in, they SMS you with the results. Now, even though you’re not at the track, you’re in the loop. *rimshot*
If you replace the phone with a URL (web address) and the friend with some arbitrary internet service, you’ve got webhooks in a nutshell. Imagine the same horse race situation, but your friend sends you the info via an online form instead of a text message.
That’s how webhooks work with MailGun too. You provide MailGun with a URL they can “call” you at when an event happens, perhaps an email delivery failure event. They post the specifics of the failure to that URL — you decide what to do about it.
Of course this all implies that you’re running a web service of some kind…
At one time that meant running your own web server, which can get costly and be a pain in the brain to maintain. But “serverless” cloud computing changed all that. Now we can implement our own webhook — and often, for just a few pennies a month. This article shows you how to do just that.
The lowdown on MailGun’s webhook implementation
So how does MailGun, uh, webhook? Here’s the lowdown. Assuming it’s legal for “lowdowns” to come in high level variations. This one comes in at around 10,000 feet. :)
With MailGun, you must register a webhook for each event you’re interested in, and for each domain you’re interested in as well.
When the event fires, MailGun will send an HTTP POST request to the URL you provided, including a “payload” with the event particulars. This payload will include a cryptographic “signature”, allowing you to verify that the message really came from MailGun and not some bozo poser.
You’ll need to respond to the HTTP post request right away with an HTTP 200 OK response, indicating that you received the message loud and clear. If something goes wrong, you’ll respond with an HTTP 406 (Not Acceptable), otherwise MailGun will continue to retry pushing the message to your URL.
But what does the payload look like?
The anatomy of a MailGun webhook payload
The details of the JSON payload you’ll receive at your webhook will vary from one type of event to the next, but the basic format will look something like this:
{
  "Signature": {
    "Timestamp": 1569339082,
    "Token": "74a890e9e4c692532d8b6f5ef9da1801bcda4321055a414568",
    "Signature": "c4e83b47d0d76ffd83b1dc08b31d5b656a9b8804b0e13e0ab32c7fe0d2237ba9"
  },
  "event-data": {
    "Event": "Complained",
    "TimeStamp": "1521233123.501324",
    "Id": "-Agny091SquKn5rX2NEKUB",
    "Recipient": "alice@example.com",
    "log-level": "warn",
    "Message": {
      "Headers": {
        "To": "Alice <alice@example.com>",
        "From": "Bob <bob@example.com>",
        "Subject": "Test complained webhook"
      }
    }
  }
}
MailGun just sends you the information and leaves it at that. It’s up to you to decide how to parse that information. In the example code we’ll use a C# library to easily “deserialize” the JSON text into C# classes, then act on it.
Determine which event was fired
When you receive a webhook from MailGun, there are two ways to know why this webhook was called:
- The webhook address itself.
- For each domain in your MailGun account, you register one webhook per event.
- The payload
- Look again at the sample payload snippet above. Notice that
event-data.Eventis “Complained”. Oops. Someone’s not too happy.
- Look again at the sample payload snippet above. Notice that
Register your webhook with MailGun
To tell MailGun where to find your webhooks, head over to “https://app.mailgun.com/app/sending/domains/__DOMAIN__/webhooks
”. That link won’t work, because you’ll have to replace __DOMAIN__ with your domain name. :)
Once you’re there, all you do is click the “Add Webhook” button in the upper right corner, then choose the event type and the URL of your webhook. Easy as slipping on whipped cream at a pie fight.
Verify the message really came from MailGun
Take another look at that sample webhook payload. Notice the “Signature” object containing the “Timestamp”, “Token”, and the actual “Signature”. In your webhook you will be able to recompute the signature to verify that the message really came from MailGun. We’ll learn how to do that in just a minute.
Next steps
If you’ve already coded a few webhooks of your own, the preceding information is all you need to get started on a MailGun webhook. Otherwise, the captain has just turned on the fasten seatbelt sign, because we’re in a steep dive to 1,000 feet! Things are about to get… detailed.
Wohoooooo!
Step B: Create a function with an HTTP Post trigger
For our next trick, we’ll create the webhook. It will take the form of a serverless function. You could use an AWS Lambda Function, a Google Cloud Function, an Azure Function, or some other lesser-known species of function. I’ll show you what the code would look like as an Azure Function, since Azure is often more developer-friendly.
Here’s an outline of what we need to do:
- Define the HTTP Post trigger
- Deserialize the payload from the HTTP request body
- Verify the request really came from MailGun
- Decide how to react to the trigger (We’ll send an email)
- Respond to MailGun right away before it tries sending the message again.
1. Define the HTTP Post trigger
In Visual Studio, create a new Azure Function app . Then replace the sample function it gives you with one like this:
[FunctionName("HandleWebhook")]
public static async Task<IActionResult> Run(
    [HttpTrigger(AuthorizationLevel.Function, "post", Route = "mailgun/webhook")] HttpRequest req)
{
    return new ObjectResult("Woah thanks for the FYI!")
    {
        StatusCode = 200
    };
}
Yup, that’s all you need. It’s not useful at this point, but it works. In fact, I recommend jumping ahead to Step D: Test your function. Then you can verify that your function is compiling and able to receive MailGun’s post requests.
2. Deserialize the payload from the HTTP request body
MailGun sends you the message as one long line of JSON-formatted text. To make it easier to work with in C#, we need to “deserialize” it, that is — convert it to a C# object.
At the top of the Run method, add this code:
using (var bodyStream = new StreamReader(req.Body))
{
    var requestBody = await bodyStream.ReadToEndAsync();
    var payload = JsonConvert.DeserializeObject<WebhookPayload>(requestBody);
    return payload;
}
All you’re doing there is deserializing the request body into the WebhookPayload object. As you may have noticed, that won’t compile. For one thing, you’ll probably need to add a using statement to the top of your file: using Newtonsoft.Json. Even more critical, you don’t have a WebhookPayload class yet!
Go ahead and create a new class called “WebhookPayload”, like this:
using Newtonsoft.Json;

namespace MailgunWebhooks.Payload
{
    public class WebhookPayload
    {
        public HmacSignature Signature { get; set; }

        [JsonProperty(PropertyName = "event-data")]
        public EventData EventData { get; set; }
    }
}
That’s a start. Unfortunately, it still won’t compile. Now MSBuild will complain about a missing HmacSignature class. There’s just no pleasing this thing. :)
At this point, I recommend just copying the class definitions from the GitHub repo , or even just cloning the repo, since I already went through the trouble of creating the classes for you.
After you get all those classes declared, the project should compile. Go ahead and test it again.
3. Verify the request really came from MailGun
When your webhook is triggered, how do you now the data really came from MailGun? What if your nemesis is posting data to your webhook in order to trick you into thinking that people are unsubscribing from your mailing list? — A nefarious foe indeed…
Fortunately, MailGun “signed” the payload. All we have to do is recompute the signature and make sure it matches the one we received from — air quotes — “MailGun.”
First, get your “HTTP webhook signing key” from your MailGun Account security page: https://app.mailgun.com/app/account/security/api_keys . Copy it to a safe place for now.
If you’ve got the repo, you’ll notice that HandleWebhook.cs contains a block of code like this:
if (!payload.Signature.IsValid(config.MailgunWebhookSigningKey))
{
    return new ObjectResult("Invalid signature")
    {
        // Mailgun will keep retrying unless we send a 406
        StatusCode = 406
    };
}
IsValid is just a method I added to that HmacSigature class, and config.MailgunWebhookSigningKey is the key you copied earlier, only it’s being brought into the Azure Function as an environment variable. (See the FuncConfig class in the repo
for more details on how to grab the signing key.)
Here’s what the body of the IsValid method looks like:
var msg = $"{Timestamp}{Token}";
using (var hmac = new HMACSHA256(mailgunSigningKey.ToByteArray()))
{
    var hash = hmac.ComputeHash(msg.ToByteArray());
    var signature = BitConverter.ToString(hash).Replace("-", "").ToLower();
    return signature == Signature;
}
Timestamp and Token are instance variables on the HmacSignature class
. All this code does is:
- Create an instance of the
HMACSHA256class, initializing it with our signing key. - Use it to compute the hash of our message, which is just
TimestampandTokenconcatenated together. - Convert the hash to a lowercase string without any dashes. This is our signature!
- Compare the computed signature with the one we received from “MailGun”.
4. Decide how to react to the trigger
This is where it gets personal. Something happened. You’ve got this message. Now how do you respond to it?
It’s up to you.
You could even just log it, if you wanted, like this:
log.LogInformation(Utils.ToJson(payload));.ToJson method)Be careful logging stuff willy-nilly though — you could run into privacy issues.
The demo repo makes use of a ResponseStrategyFactory
, which returns a different way to respond to the message, depending on the type of event that took place. Currently it just returns a GenericResponseStrategy
for all event types, which just sends an email alert containing the message from MailGun.
5. Respond to MailGun right away before it tries sending the message again
When dealing with webhooks, you need to respond fast. When MailGun sends your webhook a message, it starts tapping its foot like Sonic the Hedgehog, waiting impatiently for a response (An HTTP 200 or 406). If you take too long, it will resend the message.
So don’t do truckloads of heavy processing, email sending, or any nose picking, because that’s just not how to make an Azure function boogie. In the GenericResponseStrategy referenced above, you’ll notice that we just add the email message to a queue. That’s lightning fast, because we don’t wait around for the response. We just stick that puppy on the queue and return an HTTP 200, Alls Kool, mail dawg.
Step C: Send an email alert
Speaking of sending email alerts, how would you go about doing that in the Azure Function? As I mentioned in the previous paragraph, whatever you do, you need to do it fast. I recommend just adding the email to a message queue that will be processed by another Azure function.
Fortunately, that’s super easy in Azure, especially if you use SendGrid, which has a great SDK and NuGet package to simplify email handling.
With SendGrid, adding your email to a message queue is this easy:
var msg = new EmailMessage
{
    From = new EmailAddress("tol@example.com"),
    To = new EmailAddress("tol@example.com"),
    Subject = "Hey this is a subject",
    Body = "This is a body"
};
await emailQueue.AddAsync(msg);
(See the function declaration for the details on that “emailQueue” object)
But once your message is on the queue, now what?
You’ve got to add another Azure function to process your message queue. Fortunately, that’s super easy as well. Here’s the function:
[FunctionName("DrainOutbox")]
public static async Task Run(
    [QueueTrigger("email-outbox", Connection = "AzureWebJobsStorage")]EmailMessage queuedEmail,
    [SendGrid( ApiKey = "sendgrid-api-key")] IAsyncCollector<SendGridMessage> message)
{
    // ...
    var msg = BuildMessage(config, queuedEmail);
    await message.AddAsync(msg);
}
As usual, see the function on GitHub for the full sample code.
Step D: Test your function
How do we test this and make sure it actually works? A combination of Visual Studio and ngrok makes this easy as using the lavatory in first-class.
Configure local.settings.json
First, we need to add a few items to local.settings.json. Why? Well, when you deploy the function in Azure, you’ll configure environment variables in the portal. Usually these environment variables are for secret things that should be kept out of source control, but are necessary to make the function work. But our function isn’t running in Azure just yet. We’re still running locally in Visual Studio. .local.settings.json is where we configure the settings for our function, locally, and in the JSON format.
So, create local.settings.json file at the root of your project, if it doesn’t already exist. If you cloned the example repo, make your local.settings.json look like this:
{
  "IsEncrypted": false,
  "Values": {
    "AzureWebJobsStorage": "UseDevelopmentStorage=true",
    "FUNCTIONS_WORKER_RUNTIME": "dotnet",
    "alert-email-addresses": "alertme@example.com;",
    "from-email-address": "noreply@example.com",
    "mailgun-webhook-signing-key": "<YOUR SIGNING KEY>",
    "sendgrid-api-key": "<YOUR API KEY>"
  }
}
Just don’t forget to use a real MailGun signing key and a real SendGrid API key, or this won’t work.
IMPORTANT: Don’t leak your signing keys or api key! For example, don’t accidentally check
local.settings.jsoninto source control. Add it to your.gitignorefile.
Read that again. 👆
SIDE NOTE: Once you add your function in the Azure portal, you’ll need to create environment variables for those last four items.
Run it in Visual Studio
Make sure your code compiles, then run it in debug mode! If all goes well, you will see a command window with output like this at the bottom:
Http Functions:

    HandleWebhook: [POST] <http://localhost:7071/api/tygerbytes/mailgun/webhook>
Take note of the port number, which is “7071” in this case. You’ll need it for the next step.
Then, take note of the entire URL, because you’ll need that for the subsequent step.
Fire up an ngrok tunnel
When we test our webhook from MailGun, it’s going to need a public-facing address to connect to. Likely your computer, and thus Visual Studio, is sitting behind a firewall. Fortunately, you can use ngrok to create a temporary tunnel from the outside world to your local Azure function web service. Once you’re convinced it’s working correctly, you can add the function to your Azure account, where it will have a permanent public address and you won’t need ngrok anymore.
Let’s test this thing locally so that it’s easy to debug.
First, setup your free ngrok account and install ngrok, then run the following command from your terminal of choice:
ngrok http 7071Of course, replace “7071” with the port your local Azure function is listening on.
ngrok will build a tunnel from the big bad scary outside world to your fledgling Azure function. If it successfully builds the tunnel, look for a line like this one:
Forwarding https://f54ab30.ngrok.io -> http://localhost:7071Copy the https://...ngrok.io address somewhere.
Use MailGun’s webhook tester
We’re finally ready to test this little function! In MailGun, navigate the menu to Sending > Webhooks. On that page you’ll see a Test webhook section like the one below.
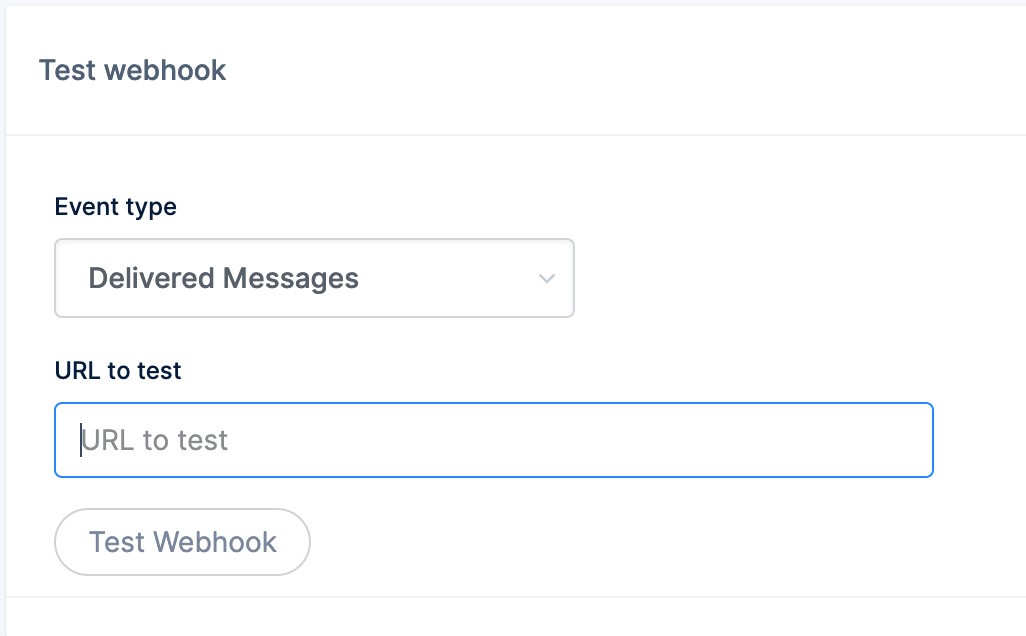
The Url to test will be a combination of your temporary ngrok address and your local Azure “HandleWebhook”. For example, given a HandleWebhook like:
http://localhost:7071/api/tygerbytes/mailgun/webhook
…and an ngrok forwarding address like:
https://f54ab30.ngrok.io
…we would combine them into the following URL, replacing localhost with your ngrok address:
https://f54ab30.ngrok.io/api/tygerbytes/mailgun/webhook
Add that URL to the Url to test box and let ‘er rip! Click Test Webhook.
If it works you’ll receive a reassuring green response message below the Test Webhook button.

You will also see some action in your Visual Studio func.exe command window as well as the ngrok session. Go ahead and familiarize yourself with the output.
Watch email roll in
Assuming you set up SendGrid and added your API key to local.settings.json, you should also get an email in your inbox.
Pretty cool, huh?
Wrapping up
Now you’ve got yourself an Azure Function capable of serving as your MailGun webhook. What’s next? Well, you still need to:
- Add your function to the Azure portal
- Customize your response to different event types
Fortunately, given the knowledge you now possess, neither of these action items is very difficult. Plus I’m sleepy. 😴 I even forgot to remind you to return your seat back and tray table to their full upright positions. (Sorry about the coffee stains.) Go forth and hook stuff!
Ty Walls
Digital Construction Worker
Ty Walls is a software engineer in love with creating, learning, and teaching.